b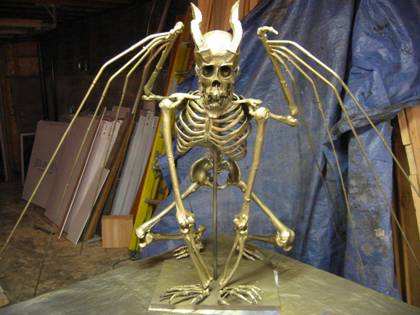
Demon Skeleton
This was NOT an easy project. Without the collaborative work of my good friend Chris and me we would not have got this one done. With his artistic ability and vision and my mechanical abilities we were able to turn something out that didn’t look half bad.
I had seen a couple of demon skeletons on the web and told Chris I wanted to make one for our yard. I ordered a 4th quality Budget Bart 4’ Skeleton from The halloweengroup for $60 just for this purpose.
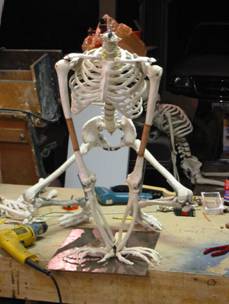
 We started by removing the Head and arms
from the Budget Bart. We then took his solid feet and cut them in half
and sanded them at an angle. Using some angle aluminum we screwed the
feet back together with a high arch so he could stand on his toes.
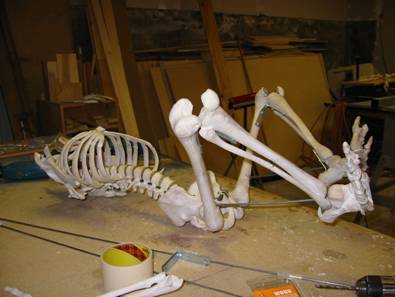
We then used some 3” angle brackets and screwed them behind the knees.
Then using a 1/8 steel rod we drilled holes in the top of the thigh bone and in
the heel and inserted the rod. This created the support for his squatting
position. We covered most of the brackets with sculpey.
We started by removing the Head and arms
from the Budget Bart. We then took his solid feet and cut them in half
and sanded them at an angle. Using some angle aluminum we screwed the
feet back together with a high arch so he could stand on his toes.
We then used some 3” angle brackets and screwed them behind the knees.
Then using a 1/8 steel rod we drilled holes in the top of the thigh bone and in
the heel and inserted the rod. This created the support for his squatting
position. We covered most of the brackets with sculpey.
 Using arms from a standard Bucky Skeleton
we cut the upper arm bone in half and using 1 inch dowel we measured a length
we would need to expand the arms so the palms rested on the ground. We
drilled holes in the ends of the dowel and the arm bone and inserted a small
steel rod and epoxy’d the heck out of it.
Using arms from a standard Bucky Skeleton
we cut the upper arm bone in half and using 1 inch dowel we measured a length
we would need to expand the arms so the palms rested on the ground. We
drilled holes in the ends of the dowel and the arm bone and inserted a small
steel rod and epoxy’d the heck out of it.
You can’t see it in this picture but we also took the pelvis of a Mr. Thrifty and split it in half attaching it to the shoulder blades of the Demon to allow for sockets to attach the wings.
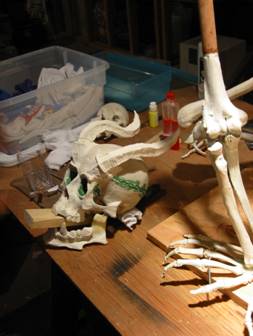
Using the head from Budget Bart and adding a jaw from a large skull model Chris added sculpey to form oversized teeth and to create the ornate horns. He used a cleaver socket technique using pvc tube melted to fit into themselves so the horns could be removed.
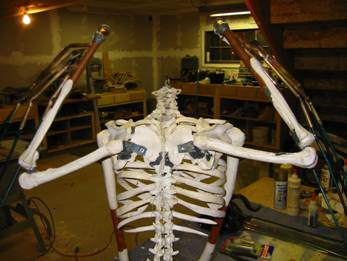
 Using the arms from the Budget bart we
detached the hands and cut the forearm bones down. To make the wings we
used copper and brass tubing. We used standard ½ plumbing pipe and
drilled four 3/8” holes along its side and inserted brass tubing which we bent
after heating it up with a propane torch and then soldered to the copper tube.
We added a copper fitting on top and inserted a finger bone from a bucky
skeleton. The entire thing was epoxied onto the arm bone. We used
some welding putty for strength and to make the wing look more like bone.
Using the arms from the Budget bart we
detached the hands and cut the forearm bones down. To make the wings we
used copper and brass tubing. We used standard ½ plumbing pipe and
drilled four 3/8” holes along its side and inserted brass tubing which we bent
after heating it up with a propane torch and then soldered to the copper tube.
We added a copper fitting on top and inserted a finger bone from a bucky
skeleton. The entire thing was epoxied onto the arm bone. We used
some welding putty for strength and to make the wing look more like bone.
The wings were attached to the pelvis sockets using some angle brackets. These were covered up with sculpey. We also used angle brackets to hold the arm joints in the right position for the wings.

We inserted bamboo stakes from the garden center into the brass rods to create the wings. We held them in place with epoxy.
The head was attached with another angle bracket from the back.
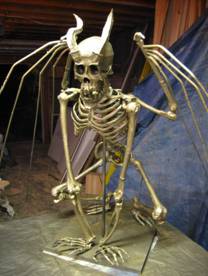 We painted the entire thing with gloss
black spray paint and then gave it a coat of brass spray paint. This gave it a
more unnatural look to it.
We painted the entire thing with gloss
black spray paint and then gave it a coat of brass spray paint. This gave it a
more unnatural look to it.
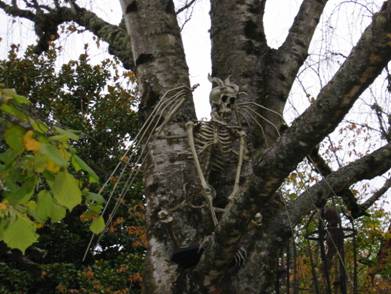
We installed it in a tree with a small half round piece of plywood for a stand. We wired it into place with light gauge wire. It was lighted with red floods.
This was a very nice prop that got a lot of compliments.